I’m excited to share my love for diy kitchen open shelving with you today. As someone who loves home design, I’ve watched kitchen shelving ideas change over time. Open kitchen shelves are still a top choice. They make your kitchen look simple yet beautiful, adding charm and making it feel airy.
Open shelving in kitchens is more than just pretty. It’s a smart way to show off your favorite dishes and keep things within reach. I enjoy using it to display my cookbooks and unique decor. It turns storage into something that catches the eye.
Key Takeaways
- Open shelving adds charm and creates a spacious feel in kitchens
- It offers both aesthetic appeal and practical functionality
- DIY kitchen open shelving allows for creative styling opportunities
- Open shelves provide easy access to everyday kitchen items
- Consider your storage needs before implementing open shelving
- Open kitchen shelves have been a popular trend for over 5 years
Introduction to Kitchen Open Shelving
Open shelving is now a big trend in kitchen design. It makes kitchens look stylish and functional. I love how it lets me create a unique and welcoming space.
Benefits of open shelving in kitchens
Open shelves make kitchens feel airy, making them look bigger. They give easy access to things I use a lot, saving time. Plus, they let me show off my favorite kitchenware, adding personality to the room.
Aesthetic appeal and functionality
Open shelves look amazing. They’re perfect for showing off colorful dishes, unique glassware, or special items. Learning to build them lets me match the look to my kitchen’s style. Whether it’s rustic or modern, they add charm.
Considerations before implementing open shelves
Before starting an open shelving project, think about a few things. Dust can be a problem, so I clean them often. I make sure the items I display will look good and fit the kitchen’s style.
“Open shelving is like jewelry for your kitchen – it adds sparkle and personality while keeping everything within reach.”
With careful planning and design, open shelving can change a kitchen into a beautiful and useful space. It’s a great way to update your kitchen without a big remodel.
Planning Your DIY Kitchen Open Shelving Project
Planning is crucial for a successful floating shelves kitchen project. I’ll walk you through the key steps. We’ll look at assessing your space, picking the right shelf spots, and selecting materials.
Assessing Your Kitchen Space
First, I examine my kitchen’s layout. I check the wall space, existing cabinets, and where appliances sit. This helps me spot the best places for my rustic kitchen shelves. I also think about how I’ll use the shelves and what I’ll store on them.
Determining Shelf Placement and Dimensions
Then, I measure with care. I find the ideal shelf dimensions using a tape measure. I ensure they fit well and don’t clash with other kitchen items. It’s key to leave enough space for taller items on the shelves.
Choosing Materials and Tools
For my floating shelves, I choose materials that fit my style. Wood is perfect for a rustic look, while metal suits a modern style. Here are the essential tools I gather:
With thorough planning, I’m set to begin my DIY kitchen open shelving project. I’m excited to see how these new shelves will change my kitchen’s look and function!
| Shelf Material | Pros | Cons |
|---|---|---|
| Wood | Warm, rustic look | May warp over time |
| Metal | Sleek, modern appearance | Can be cold to touch |
| Glass | Elegant, light-reflecting | Requires frequent cleaning |
Selecting the Right Materials for Open Shelves
Choosing the perfect materials for your modern open shelving is key in diy shelving projects. The right selection can greatly improve both the look and function of your kitchen.
Wood is a top choice for its warmth and flexibility. Pine is affordable, while oak is durable. For a unique look, consider reclaimed timber. Metal shelves add a sleek, industrial feel and can hold more weight.

Glass shelves give a light, airy feel but need careful installation and cleaning. For those on a budget, cedar fence boards or decking materials work well. They can be tailored to match your kitchen’s style.
The key is to balance aesthetics with practicality. Your shelves should match your kitchen’s color scheme and be strong enough for your dishes and appliances.
Here’s a quick comparison of common materials for diy shelving projects:
| Material | Durability | Style | Cost |
|---|---|---|---|
| Solid Wood | High | Rustic/Traditional | Medium-High |
| Metal | Very High | Industrial/Modern | Medium |
| Glass | Medium | Contemporary | High |
| Cedar Fence Boards | Medium | Rustic | Low |
The finish you pick can change how your shelves look. A clear varnish shows off the natural wood grain. Paint lets you choose from many colors for your modern open shelving.
Step-by-Step Guide to Installing Open Shelves
Are you ready to change up your kitchen with open shelving? This guide will walk you through building open shelves easily. Let’s get started with the DIY kitchen open shelving process step by step.
Preparing the Wall Surface
Begin by cleaning the wall well. Remove any dirt, grease, or old paint. Then, fill holes and smooth out the surface. This makes a strong base for your shelves.
Measuring and Marking Shelf Positions
Use a level to mark where your shelves will go. Measure and check your marks twice. Getting it right is important for a professional look.
Installing Brackets or Supports
Pick strong brackets that can handle your items’ weight. If you’re not hitting studs, use heavy-duty wall anchors. Ensure the brackets are level and correctly placed.
Attaching the Shelves Securely
Attach your shelves to the brackets now. Double-check they’re level before securing them. For floating shelves, follow the maker’s instructions closely.
| Step | Tools Needed | Time Required |
|---|---|---|
| Wall Preparation | Cleaning supplies, sandpaper | 30-60 minutes |
| Measuring and Marking | Level, pencil, tape measure | 15-30 minutes |
| Installing Brackets | Drill, screwdriver, wall anchors | 30-45 minutes |
| Attaching Shelves | Screws, drill, level | 15-30 minutes |
Follow these steps for stunning open shelves quickly. Remember, patience and care are key for a successful DIY kitchen open shelving project.
DIY Kitchen Open Shelving: Easy Storage Solutions

I love how open shelf storage changes the game in kitchens. It boosts both style and function. Let’s dive into some creative ways to make your kitchen look great.
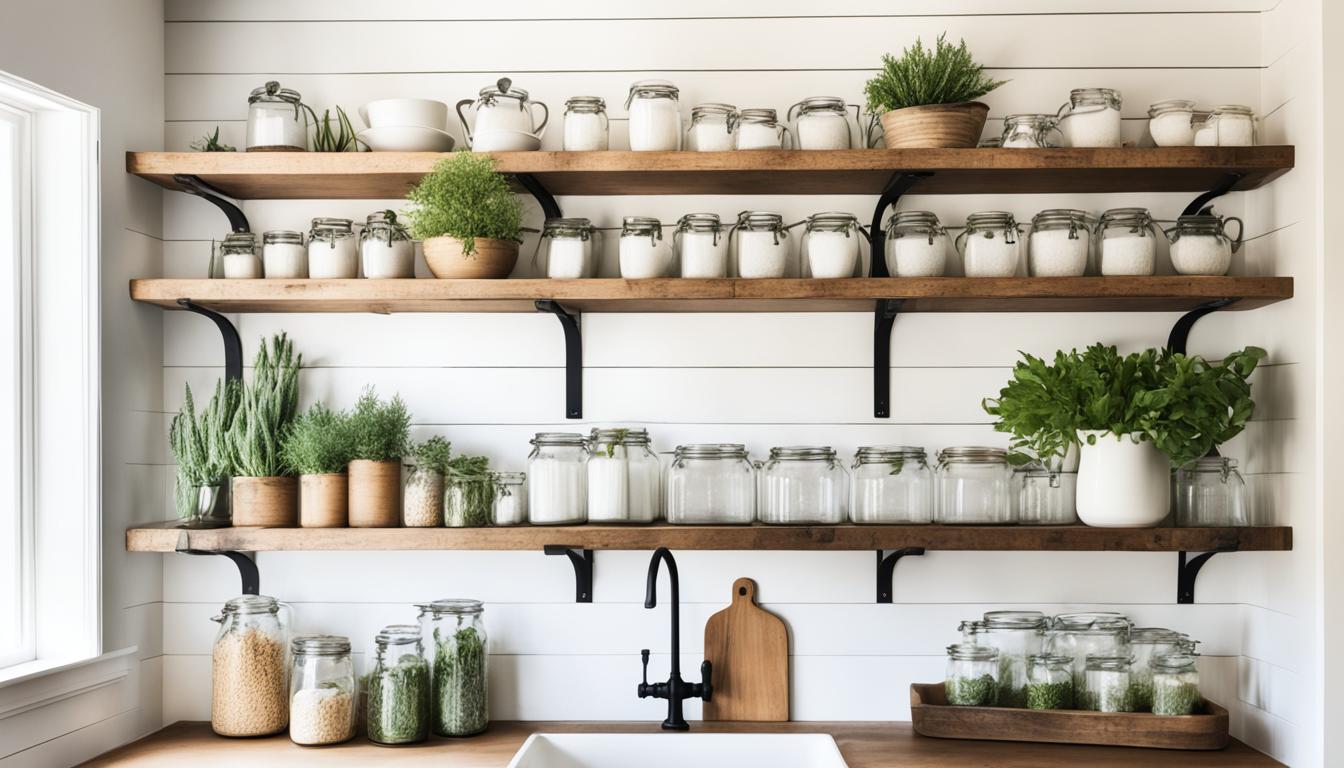
Baskets and canisters are perfect for organizing small items on open shelves. They keep things neat and add a unified look. I put similar items together, making it easy to find things and keeping the look balanced.
Mixing open and closed storage is crucial. I use open shelves for everyday items and closed cabinets for things I don’t want to see. This way, I can show off my favorite pieces and keep clutter hidden.
It’s fun to personalize open shelves! Adding decorative items next to functional ones makes them stand out. A small plant, a vintage cookbook, or a unique piece of pottery can make your shelves special.
“Open shelving isn’t just storage; it’s an opportunity to express your style and make your kitchen uniquely yours.”
Here’s a quick guide to organizing different items on open shelves:
| Item Type | Storage Solution | Styling Tip |
|---|---|---|
| Dishes | Stack in neat piles | Arrange by color for visual impact |
| Glassware | Group by type | Create a gradient effect with different sizes |
| Spices | Use matching jars | Alphabetize for easy access |
| Cookbooks | Stand upright or lay flat | Use bookends as decorative elements |
With these ideas, you can create a functional and stylish open shelf storage system. The key is to balance practicality with your personal style.
Styling Your Open Shelves for Maximum Impact
Open kitchen shelves can change a space, mixing style with function. Modern open shelving is all about finding the right balance. Let’s look at some ways to make your shelves stand out.
Arranging Dishes and Kitchenware
Begin by putting similar items together on your shelves. Stack plates, bowls, and cups neatly. Add larger items like pitchers or serving bowls for interest. Switching colors and textures keeps the shelves lively.
Incorporating Decorative Elements
Add personal touches to your shelves. I like putting a small potted herb or a vintage teapot with everyday items. Art or framed photos add character. These should match your kitchenware, not take over.
Balancing Functionality and Aesthetics
Open shelves serve two purposes. Keep things you use often within reach. But, don’t forget to show off your favorite pieces. I change my shelf decor with the seasons, using summer glasses and winter mugs. This keeps the space interesting all year.
By arranging items thoughtfully and adding decor, you can make your open shelves both useful and beautiful. The secret is to try different things and see what suits your space and style.
Maintaining and Cleaning Open Kitchen Shelves
I adore open shelving in my kitchen, but keeping them clean is tough. With my diy projects, I’ve found that regular upkeep is crucial. I dust my shelves and items every week to stop dust from building up. For upper shelves with items we don’t use often, I clean them in the dishwasher before putting them out.
To make cleaning simpler, I put often-used items on lower shelves. This makes them easy to reach and cuts down on dust. When picking cleaning products, I choose ones that won’t harm my shelves. This keeps my open shelves looking great and in good shape.
Quick Cleaning Tips
- Use a microfiber cloth for daily dusting
- Deep clean shelves monthly with a mild soap solution
- Rotate items regularly to prevent dust accumulation
- Apply food-safe mineral oil to wooden shelves every few months
By following these easy steps, I keep my open kitchen shelves clean and welcoming. It’s worth the effort for the beauty and usefulness they add to my kitchen. With the right care, my diy shelving projects remain a key part of my home’s look.
Creative Ideas for Open Shelf Organization
Open shelf storage is a great way to organize your kitchen creatively. I’ve found some amazing ideas that mix style with function. Let’s see how to make the most of your open shelves for a beautiful display.
Using Baskets and Containers
Baskets and containers change the game for open shelf storage. I use woven baskets for small items like spices or tea packets. Clear glass jars are perfect for dry goods, making your shelves look clean and uniform.
These containers keep things neat and add style to your kitchen shelves.
Grouping Items by Color or Function
Organizing by color makes your open shelves look stunning. I arrange my colorful mugs in a rainbow pattern for a beautiful display. Or, group items by their use. Put baking supplies and everyday dishes on separate shelves.
This way, you can easily find what you need and keep things looking organized.
Incorporating Plants and Herbs
Adding plants to your open shelves brings life to your kitchen. I keep small potted herbs like basil and rosemary on my shelves. They’re decorative and useful for cooking.
Trailing plants in hanging pots can soften your shelves and bring nature into your kitchen.
With these creative ideas, you can turn your open shelf storage into a beautiful and useful part of your kitchen. The key is to mix practicality with style for a space that looks good and works well.
Open Shelving vs. Traditional Cabinets: Pros and Cons
Floating shelves have become popular in kitchens lately, and it’s easy to see why. They bring a modern look that can change the feel of any kitchen. But how do they compare to traditional cabinets? Let’s look at the pros and cons.
Floating shelves make your kitchen feel open and airy. They’re great for showing off your favorite dishes or those rustic kitchen shelves you love. They also make it easy to get to things you use often. However, they need more dusting and staying organized to look good.
Traditional cabinets are less trendy but offer more storage space. They’re perfect for hiding big appliances and keeping your kitchen neat. But, they can make a small kitchen feel smaller and limit your design choices.
| Feature | Floating Shelves | Traditional Cabinets |
|---|---|---|
| Visual Appeal | Open, modern look | Classic, enclosed appearance |
| Storage Capacity | Limited, visible storage | Ample, hidden storage |
| Maintenance | Frequent cleaning needed | Less frequent cleaning |
| Accessibility | Easy access to items | Items may be harder to reach |
| Space Perception | Makes space feel larger | Can make space feel smaller |
In my experience, combining both styles works well. Use floating shelves for everyday items and decor, and traditional cabinets for things you don’t want to see. This mix gives you the best of both worlds – the style of rustic kitchen shelves and the practicality of closed storage.
Budget-Friendly Tips for Open Shelving Projects
I love DIY kitchen open shelving projects, but they don’t have to be expensive. Let’s look at some easy ways to make stunning open shelving without spending too much.
Using cedar fence boards is one of my top tips. These boards are affordable and can look amazing with a bit of sanding and staining. Another great choice is reclaimed wood. It adds charm to your kitchen and is good for the planet.
For brackets, check out IKEA and local stores for good deals. If you’re up for it, building your own floating shelves can save you money and be fun.
Repurposing for Unique Designs
Think outside the box with materials you already have or find. An old ladder can turn into a quirky shelving unit, or wooden crates can be mounted as shelves. These ideas make your kitchen stand out and save money.
Remember, one person’s trash is another’s treasure. Secondhand stores and online marketplaces are full of affordable materials and accessories.
Here’s a quick look at budget-friendly materials for DIY kitchen open shelving:
| Material | Cost | Durability | Ease of Installation |
|---|---|---|---|
| Cedar Fence Boards | Low | Medium | Easy |
| Reclaimed Wood | Low-Medium | High | Medium |
| Repurposed Furniture | Very Low | Varies | Easy-Medium |
| DIY Floating Shelves | Medium | High | Challenging |
With these budget-friendly tips, you can make beautiful open shelving that improves your kitchen’s look without draining your wallet.
Conclusion
I’ve shown you the world of DIY kitchen open shelving, and I hope you’re excited too. Open kitchen shelves are practical and pretty. They let you display your favorite dishes and keep them within reach.
Choosing open shelving updates your kitchen and makes it feel more welcoming. It’s a way to make your home uniquely yours. Yes, it might mean more dusting, but the style it adds is worth it.
Whether you’re redoing your whole kitchen or starting with a small project, DIY open shelving is a great choice. With some planning and creativity, you can turn your kitchen into a space that reflects your style. So, pick up those tools and begin your open shelving project!
FAQ
What are the benefits of open shelving in kitchens?
What should I consider before implementing open shelves?
How do I plan for a DIY open shelving project?
What materials are suitable for open shelves?
How do I install open shelves securely?
How can I style open shelves effectively?
How do I maintain and clean open kitchen shelves?
What are some creative ideas for open shelf organization?
What are the pros and cons of open shelving vs. traditional cabinets?
How can I create affordable open shelving?